Hi,
I'm using ODK Central on DigitalOcean for a longtime but now I have a situation where the data collection campaign will take place offshore on a vessel without internet connection. I need to set up Central on a machine that should be accessible from the local network. The collectors will connect to the same network whenever they need to get blank forms or upload completed forms. I used Aggregate before, running on a VM, without any problems but I'd like to use Central now. I've set up Central on WSL2, using local for domain and it runs without problems but it's only accessible from the machine it is running on. on 127.0.0.1 or the WSL eth0 IP.
What should I do? I'd like to avoid using a local DNS server.,
Thanl you.
Hello @Razvan_Zaharia,
Sounds like some exciting stuff. Luckily, I have a similar setup and can walk you through the process. The main difference is I'm running mine off an instance from my ESXi box at home but I sincerely believe it should work, or at least give you some ideas on how to approach this.
First step is to register for a free domain name from DuckDNS. Logic behind this is Central (and don't quote me on this ![]() ) will not build without a full-form domain name. You will probably end up with something like
) will not build without a full-form domain name. You will probably end up with something like mychosendomain.duckdns.org.
Next step is to setup a container to run Nginx Proxy Manager (referred to as ngPM later). One thing to keep in mind is Central will be using ports 80 and 443 hence we have to redirect any other service that would also like to make use of these ports. For this reason, I setup ngPM to use ports 8080, 81 and 4443 (instead of 443). It would be also helpful to mount 2 directories data and /etc/letsencrypt to keep those persistent just in case. You can find a copy of my docker-compose file attached here. Simply remove the .txt extension (file upload does not support .yml)
docker-compose.yml.txt (323 Bytes)
Navigate to the local device's IP and port 81 if you used the same config as me and create a user account for your instance of ngPM.
Third step is to use ngPM to obtain an SSL certificate from LetsEncrypt using a DNS Challenge. On ngPM's web interface, click on SSL Certificates from the navigation options
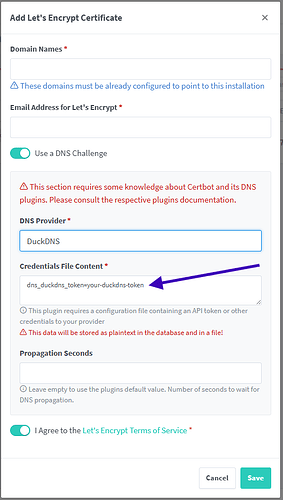
and then Add SSL Certificate in the top right corner of the page that loads up. You should be greeted with a popup like the one below.
One thing I forgot to mention earlier (that you probably already figured out) is you will need to create a record on DuckDNS when creating your domain name that will require the IP of the local device that will be running both Central and ngPM. Don't worry about public IP and whatnot, just supply the internal IP of the device in question.
Supply your domain name, email address and DuckDNS token in the appropriate sections shown in the image above. It is crucial to also add a wildcard record (eg: *.mychosendomain.duckdns.org for the example domain I used earlier) in the Domain Names section.
Ensure to toggle the option for Use a DNS Challenge and to choose DuckDNS as the DNS Provider. Click save when you have provided and confirmed all required information and allow ngPM and LetsEncrypt to work their magic in the background. By the way, its an absolute must to grab a cup of coffee/tea/smoothie here ![]()
If everything goes well, you should see something similar to this.
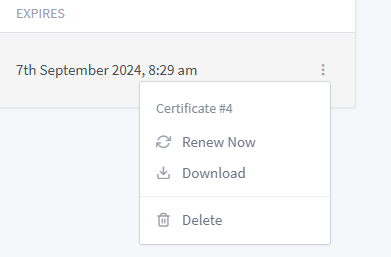
The next thing to do will be to download the issued certificates and keep them tucked for a step down the road. We're almost done, I promise

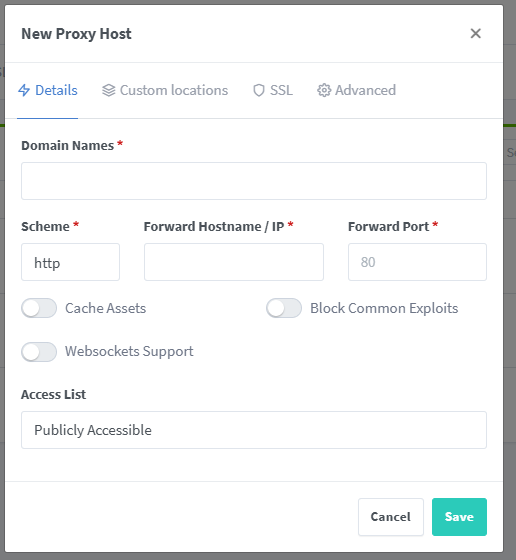
From ngPM's navigation, click on Hosts and select Proxy Hosts. Click on Add Proxy Host from the upper right corner of the screen. You will be greeted with this popup.
This is where the wildcard record we added when requesting for the SSL Certificate comes in handy. For the Details tab and under domain name, you can insert something like
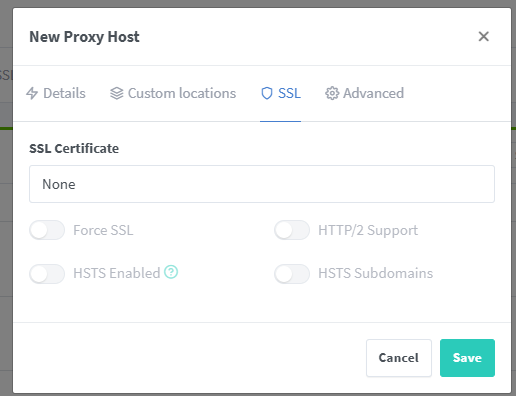
odk.mychosendomain.duckdns.org or whatever you prefer. Change the scheme to https, insert the local machine's IP under Forward Hostname/IP and 80 under Forward Port. Then switch to the SSL tab and select the SSL Certificate you were issued. You can also toggle the Force SSL and HTTP/2 Support options and save your record.
Final steps will involve Central. Edit your .env file as follows.
Set your domain to the domain used when creating the proxy host (eg: odk.mychosendomain.duckdns.org). Also set the SSL_TYPE to customssl.
Remember the certificates I asked you to stash? Well, you'll need to extract the fullchain.pem and privkey.pem files and copy them to the central/files/local/customssl/ directory as specified here. I believe the final thing to do will be to build/rebuild Central and you'll be able to use all services on the same network, no problem.
Let me know if this helps you out. Sorry its rather long.
Cheers!
Thank you for the very quick response. I wasn't expecting to be that fast. I will try and let you know as soon as possible. Thanks again.
@Razvan_Zaharia
Were you able to put this to use? Did the post above help or did you encounter any issues?


